How to Make Flashcards in Google Docs (Step by Step)
To make flashcards in Google Docs, insert a two-column table, type your term in the left cell and the definition in the right cell, then print and cut the rows into cards (or fold a double-sided sheet so the answer lands on the back). It works, it's free, and it takes about ten minutes for a small set. If you'd rather skip the table-building and get a deck you can flip on screen and print clean double-sided, you can build the whole thing with our free flashcard maker instead.
Both paths get you studying. This guide walks you through the Google Docs method click by click, then shows you the faster route when you want spaced repetition, active recall, and a tidy printout without fighting with table borders.
Can You Actually Make Flashcards in Google Docs?
Yes, and a lot of students do. Google Docs doesn't have a "flashcard" button, but it has tables, and a table is really just a grid of cards waiting to happen. You put the question on one side and the answer on the other, then print.
The trade-off is honest: Docs is great for the writing part and clunky for the flipping part. You can't shuffle a Google Doc, you can't quiz yourself on screen, and getting the answer to print on the exact back of each card takes some fiddling. For a quick set of 20 terms before a quiz, it's fine. For a 200-card deck you'll review all semester, a dedicated tool saves you real time.
Here's the good news: you don't have to choose blindly. Try the Docs method below, and if it starts feeling like a chore, the free flashcard maker is one click away.
What You'll Need
Nothing fancy. Just:
- A Google account (free)
- Your list of terms and definitions
- A printer, if you want physical cards
- Optional: cardstock or thicker paper so cards don't go floppy
If you already have your terms typed in a list or a spreadsheet, even better. You can paste them straight into the table.
Method 1: The Two-Column Table (Print and Cut)
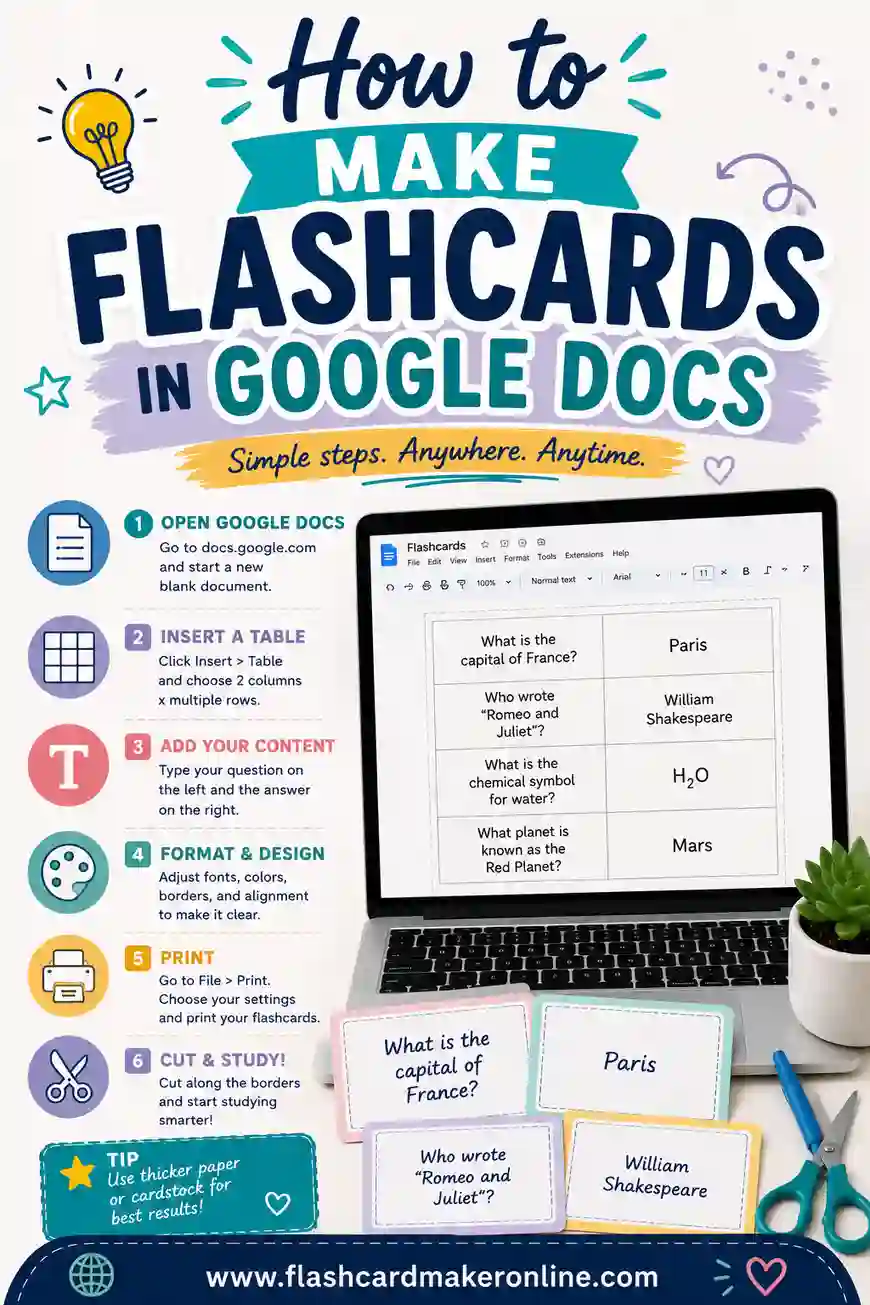
This is the simplest way to make flashcards in Google Docs. Each row becomes one card: term on the left, definition on the right.
- Open a new doc. Go to docs.google.com and start a blank document.
- Insert a table. Click Insert → Table and choose 2 columns and as many rows as you have terms. You can always add rows later by pressing Tab in the last cell.
- Label your columns (optional). Type "Term" in the top-left cell and "Definition" in the top-right cell so you don't lose track.
- Fill in your cards. One term per row on the left, its matching definition on the right. Press Tab to jump to the next cell.
- Make it readable. Bump the font to 14–16pt and bold the terms. Add a little row height so each card has breathing room.
- Print and cut. Go to File → Print, print the page, then cut along the rows. Each strip is a two-sided "card" with the term and answer side by side.
This version keeps the term and definition visible together, which is good for a first read-through but bad for self-testing — you can see the answer the whole time. To fix that, use Method 2.
Method 2: Double-Sided Cards (Term Front, Answer Back)
For real flashcards, you want the term on the front and the answer hidden on the back. Here's the Docs workaround.
- Make a table grid. Insert a table sized to your cards — for example, a 2×4 grid gives you eight cards per page.
- Type only the terms on page one, one per cell.
- Add a second identical table on page two for the answers. The trick: the answer for the top-left card must sit in the top-right cell of page two, because the back of a sheet is mirrored when you flip it.
- Print double-sided. In the print dialog, choose Two-sided and flip on short edge (test one page first).
- Cut the grid into cards. Now each card has a term on the front and its answer on the back.
That mirroring step is where people lose patience — it's easy to get cards out of order. If you print one test page and the answers land on the wrong cards, that's normal, and it's exactly the headache our tool removes by handling the back-side layout for you automatically.
Method 3: Use a Google Docs Add-On
If you search the Google Workspace Marketplace inside Docs (Extensions → Add-ons), you'll find a few flashcard add-ons that auto-format your list into cards. They can speed up the layout, but they vary in quality, some ask for permissions, and a few put their branding on your printout. Try one if you like, but check reviews first.
A Ready-to-Use Sample Deck
Not sure what your cards should look like? Here's a clean sample set you can copy straight into a Google Docs table (or paste into the flashcard maker). This one covers basic study and document terms — swap in your own subject.
| Term | Definition |
|---|---|
| Active recall | Pulling an answer from memory instead of rereading it |
| Spaced repetition | Reviewing material at growing intervals over days and weeks |
| Term | The word or question shown on the front of a card |
| Definition | The answer shown on the back of a card |
| Insert table | The Google Docs menu path that adds a grid of cells |
| Two-column layout | Term in the left column, definition in the right |
| Merge cells | Combining selected table cells into one larger cell |
| Page setup | Where you set paper size and margins before printing |
| Double-sided print | Printing the answer on the back of the same card |
| Flip on short edge | The print setting that keeps two-sided cards aligned |
| Cardstock | Thicker paper that keeps cards from going floppy |
| Cut line | The row or column border you cut along to separate cards |
| Front | The side of a card showing the prompt |
| Back | The side of a card showing the answer |
| Deck | A full set of related flashcards |
| Shuffle | Randomizing card order so you don't memorize position |
| Self-test | Quizzing yourself rather than rereading notes |
| Leitner system | Sorting cards into boxes by how well you know them |
| Cue | The prompt that triggers your memory |
| Retrieval | The act of bringing an answer back to mind |
That's 20 ready-made pairs. Drop them into a two-column table and you've got an instant deck to practice the method on.
Google Docs vs. a Dedicated Flashcard Maker
Both make cards. They're good at different things. Here's the honest comparison.
| Feature | Google Docs | Flashcard maker |
|---|---|---|
| Cost | Free | Free |
| On-screen flipping | No | Yes |
| Shuffle / self-test | No | Yes |
| Double-sided print layout | Manual, fiddly | Automatic |
| Spaced repetition | No | Built for it |
| Best for | Quick small sets | Decks you'll study repeatedly |
Google Docs wins when you just need a few cards printed once and you already live in Docs. A dedicated maker wins the moment you want to flip cards on your phone, shuffle them, or print a clean two-sided set without the mirroring math. There's no wrong choice — pick the one that matches how you'll actually study.
Printing Tips That Save Paper and Frustration
A few small choices make your cards look sharp.
- Use cardstock. 65–110 lb paper survives a backpack; printer paper folds and tears.
- Print one test page first. Especially for double-sided layouts — confirm the answers line up before you waste a stack.
- Keep terms short. Long definitions shrink your font. Trim to the core idea.
- Bold the front, plain the back. It makes scanning a stack of physical cards faster.
- Bigger margins, fewer cards per page. Crowded grids are hard to cut straight.
If you're studying mostly on a screen anyway, you can skip printing entirely and just flip cards in the free tool.
Frequently Asked Questions
Does Google Docs have a flashcard template?
Not a built-in one. You make flashcards in Google Docs by inserting a two-column table (term and definition) or a card grid for double-sided printing. Some Marketplace add-ons offer templates, but the table method works without installing anything.
How do I print double-sided flashcards from Google Docs?
Set up two matching table grids — terms on page one, answers mirrored on page two — then choose "Two-sided" and "flip on short edge" in the print dialog. Always print one test page to check the answers land on the correct backs before printing the full set.
What's the fastest way to make a lot of flashcards?
Paste your term-and-definition list into a dedicated flashcard maker. It formats the cards, lets you flip and shuffle them on screen, and lays out a clean double-sided printout automatically, which beats hand-building tables for big decks.
Can I study Google Docs flashcards on my phone?
You can open the doc and scroll, but you can't flip or shuffle the cards — Docs just shows your table. For phone-friendly flipping and self-testing, use a flashcard tool built for it.
Is making flashcards in Google Docs really free?
Yes. Google Docs is free with any Google account, and the table method costs nothing. The only cost is paper and ink if you print. Our online flashcard maker is free too, with no sign-up.
How many flashcards should I put on one page?
For double-sided cards, six to eight per page (a 2×3 or 2×4 grid) prints cleanly and cuts easily. Cramming more makes the font tiny and the cut lines hard to follow.
Ready to Build Your Deck the Easy Way?
The Google Docs table trick is a solid backup, and now you know exactly how to do it. But if you want cards you can flip on screen, shuffle, self-test with, and print double-sided without the mirroring puzzle, open the free flashcard maker and paste your list in. You'll have a study-ready deck in under a minute. Want to keep going? See the science behind why flashcards work, how to study faster, and how to make medical flashcards. Happy studying.